Showing posts with label Sewing. Show all posts

Tuesday, June 21, 2011

Sports Bras From Tank Tops

 You know all those layering tank tops with hidden shelf bras that you have way too much of?  The ones that look like these?  Well, when you don't want to spend $10 for a set of 3 at Walmart for new sports bras, you can just turn a tank into one.  And it's so easy - just one cut and one seam.  Here's how:
 Turn your tanks inside-out.  See the shelf-bra?  It's basically just an extra layer of knit fabric sewn to an elastic band that gives you extra coverage and lift.  So just cut the whole shirt off about an inch or 1 1/4" below that elastic band with scissors or a rotary cutter, and fold it over the elastic.
 
 Sew that extra inch or 1 1/4" up over the elastic band with a zig-zag stitch.  We use a zig-zag instead of a straight stitch because you're going to be pulling this over your head, and if you use a straight stitch that has no give, the seam will pop right out.  Don't worry about finishing the edge; this is knit fabric we're working with here, and it doesn't fray in the wash.  It simply rolls.
 Now you have a whole slew of sport bras that fit you whether you're pregnant or not.  They're also great for working out, though they're probably not to be worn alone on those who have been blessed in the chest; the spaghetti straps could cut into your shoulders.
 But for me, they're awesome for wearing under low-cut tops.  Modesty without the binding fabric around the big belly.

Monday, June 20, 2011

Toddler Shirts from Adult T-Shirts

 I was totally going to call this post "Toddler Shirts from Old Adult T-Shirts" but I realized that sounded like I was re-purposing old people clothes.  I made each of these tops from a shirt a friend gave me.  I can't wear them because I'm too pregnant, but Autumn needed new clothes, so dehr you go.
Ruffle Detail
 Making kids' clothes (boys and girls) from your old clothes is super-easy. No really, it is.  Just take a shirt of the kid's that fits him/her well, lay it on top of your shirt, and start cutting.  I like to line up the hem of the shirt and sleeves when possible.  Cut 2 identical pieces for the shirt body, and cut the small sleeves out of your big sleeves.  Sew it all together with straight stitches and don't worry about finishing the edges; it's knit, so they won't fray.
Shirred Neckline Detail
 This one was cute, with a sun and cloud and trees.  I used shirring on the neckline because I cut it too big, and only one line of shirring stretches really easily, so though it looks like it chokes her I promise it doesn't.
Here's a picture of Autumn wearing a shirt that used to have a delicate bird on the front.  In re-sizing it and giving it an empire-waist, I accidentally cut the bird's head off.  I don't think he felt it, though.

Who says having kids is expensive?  (I know I'm going to eat those words one day...)

Monday, June 13, 2011

Maternity Shorts

 I found these shorts at Ross for just $9, though the non-maternity name brand tag said $32 original price.  I figured the fold-over cotton stretchy waistband would make them the perfect maternity shorts.  They're made of slightly stretchy fabric, and they don't make me look like I have diaper butt like all the real maternity shorts do.  I also decided to lay them out flat and make a pattern of them so I could have more than one pair of shorts. 
 
 And here's what I made from that pattern!  I already had the khaki fabric on hand, thanks to a friend, and the stretch fabric I used for the waistband as well.
 You can see how the fold-over waist band is super-comfortable around the belly.
 I added pockets in the front and little pocket flaps in the back for appearances only (non-functioning), and had planned to sew some cute buttons on the flaps.  One day.  Probably not though.
 So for $9 and two nap-times, I got 2 pairs of shorts.  Now that I have the pattern I made from the store-bought pair, I can make as many pairs of these as I want!  I'm going to make some olive green ones next.

Would you like to learn how to make your own shorts from your own pattern?  Come back later this week for the step-by-step tutorial on how to make your own pattern for these!


Monday, May 16, 2011

Pretty Things

The inspection on the house was today, and all went well.  To celebrate, I thought I'd break the house hunting monotony with a little creative expression.  Here are a few diddies I've made over the last few weeks:
Here's a flannel night gown I made my daughter.  Couldn't resist adding the white eyelet lace and silver ribbon.
It's way girlier than I'd ever have wanted really, but I guess she can have one flowery thing. ;)
I also made her this mini skirt from some knit fabric.  I love the yellow and heather gray stripes.  It was only $1.97/yd at Hancocks!
This is another flannel gown I made her.  It's akin to a mumu, and has flutter sleeves.
Now that it's been washed once, it's sooooo soft!
This used to be a pink onesie, but it became too short for my little girl's long torso, so I cut off the bottom with the snaps.  It became way too short, even as a shirt, but her slender little figure still fit its width.  I gathered and added some cotton print fabric to the bottom by Free Spirit, and a sash of the same to the waistline, attaching it only in the front center.
Here's a photo from the back with the sash tied.
I think it looks very 50's, and it's a great way to extend the life of a onesie!
Here's a long twirly skirt I made the little girl from some turquoise knit fabric.
It goes down to the bottom of her calves, and was very easy to make.  Just elastic and fabric!
And finally, something for me!  This was a skirt my friend Melissa gave me.  I turned it into a maternity strapless top!
I removed the darts from the top and the waistline, then folded over the top and threaded wide elastic through for a secure fit.  I also sewed 1/4" elastic just below the bust line all the way around for a flattering shape.
These ruffles were already on the skirt - love how I didn't have to do anything to the hem!
I also left the original invisible zipper in the back for easy dressing.

Well, that's about it folks! Hope y'all are having a great start to your week!

Thursday, April 14, 2011

Maternity Wear 10 - The Finale and a D'oh! Moment

So I took all these photos of these pants I was going to maternicize for y'all for the final Maternity Wear project, as well as detailed photos of steps along the way, then went to a friend's house with another friend and got what might have been some sweet photos there, got home, and went to put the memory card in the laptop...and it was already in there.  As in, not in the camera.  At all.  No "before" or "during" shots, no memories of friends today,  no nuthin.  Sigh.  But the show must go on...
 
So for anyone who's not familiar with commercially available maternity clothes, this is a typical pair of maternity capris (from Target).  You may say, "They look dumpy because they're low-end Target."  Check yourself.  They look dumpy because they're maternity clothes and clothing designers apparently think your butt is suddenly going to balloon to three times its normal size the moment your belly's too big for a fitted waistband.  It doesn't happen that fast. ;)
See? Dumpy butt.  I typically have to roll the waist down on these to get the Bozo vibe under control.  I certainly don't feel I can look put-together or (heaven forbid) dressy in these.  So I decided for the tenth Maternity Wear project I would make over a pair of non-maternity capris that actually fit me.
Oh my goodness!  Pants that fit comfortably AND look good!  These Gap capris were a $4 score at Goodwill, so I didn't feel too badly about chopping the waistband off. 
 Look! I have a butt again!
 You'd never believe they were so comfortable with this belly, but they are.
 
To make your own comfy pants, simply cut the zipper out of pants and top stitch the fly closed (you cut the zipper out so you don't accidentally break a needle later).  Then you take some stretchy fabric (double the thickness you want on your waistband), fold it over some wide elastic you've measured to your waist and sewn ends together, and sew the stretchy fabric to the edge of your pants where you just cut the waistline off, right sides together.  Again, I'm sorry I was so dumb and left the card out of the camera so you have no before/during photos to go by.
 See the seam where I sewed the new stretchy waistband with elastic inside to the pants?  I also top stitched a straight line just over the elastic through the stretchy waistband to keep the elastic in place.  Then I zig-zagged the edges so they won't fray in the wash.  I finished this before showering this morning. It really takes very little time.  But I couldn't stop at capris!
 I have no maternity shorts, and Tehas gets HOT in the summer.  So while I normally stick to skirts and capris for modesty's sake (and because I've been led to believe I have knobby knees), it's great to have a pair of shorts to turn to when the mercury bursts out the thermometer.  These were gifted to me by a dear friend.
 They were actually almost too small before I got pregnant, so this will help them fit better after I have the baby too.  I did the same thing as with the capris.  The fabric you use for the waistband just needs to be knit and stretchy.  I used some polyester blend knit I had from two belly bands I'd made for my first pregnancy (which happened to match the colors of the pants I needed to make over, thank heavens!) but you could even use the bottom of an old t-shirt that fit well.  I don't understand why ALL pants don't have elastic waistbands; they're so comfortable, and you don't even have to undo them after a meal! ;)

That's all for this week.  Come back Monday and I'll try to have some in-process photos of the next quilt I'm working on for ya.  Have a great weekend!

Wednesday, April 13, 2011

Maternity Wear 9

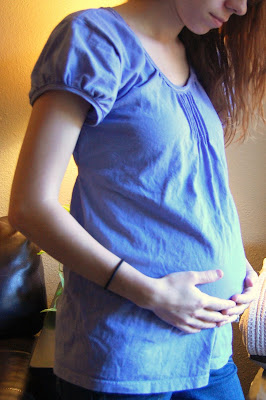
 Alright, friends, here's a men's size L t-shirt from Goodwill.  I'm not sure what kind of man wears periwinkle, but I'd imagine it's a very manly-man, who is very confident...and obedient when his wife tells him to throw the thing away.
 Looks like it's got enough room in the belly region for now.  Let's give this thing a facelift.
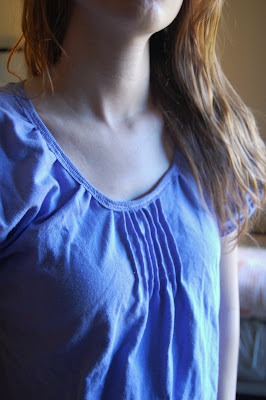
 Please pardon the crappy photo.  It was dark in here, had to use the flash.  I cut off the neckline and 2" of sleeves and scavenged the original neckline hem and sleeve hems to finish the neck and sleeves on the revamp.
 So here it is! I really like it with these navy jeggings ($5 at Walmart).

 I put about 9 pintucks in the back before realizing I just needed a ribbon to cinch it. 
 Very comfortable.
 Here's a closeup of the neckline, with more pintucks and gathering.
 I also gathered the sleeves.
I like it.  Alright, tomorrow is the last day of Maternity Wear! Stop by to see the grand finale (gee, I hope I can drum up something good!)

Maternity Wear 8

 So I realized I had 5 shirts all within the same color family that were not maternity-friendly and realized I don't need 5 purple shirts.  So I left the stained tank as-is and cut 4" wide strips out of the others.
 I gathered the strips and sewed them in a somewhat hap-hazard tiered fashion onto the front of the tank, starting just below the bust line.  Basically I was trying to copy a shirt my daughter has that I love.
 At first it seemed really odd to leave the back empty, but I didn't have enough strips of fabric to cover it too and it had a slimming effect (not like I need that now, but in a few months I might appreciate it).
 It's super comfortable, and should be wearable after I have the baby too.
Here's a closeup so you can see the little zigzags I used to attach the strips to the front.  I kinda like that they turned out a little wonky; it's less store-bought/perfect looking.  Come back tomorrow for another transformation!  Just 2 more before I hit my quota!